


PS5 Controller Shoulder Button Extenders
Custom Triggers & Bumpers to Increase
Speed and Improves Accuracy

Update your browser to view this website correctly. Update my browser now
PS5 Controller Shoulder Button Extenders
Custom Triggers & Bumpers to Increase
Speed and Improves Accuracy

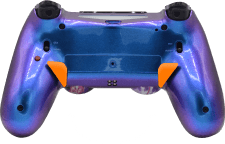
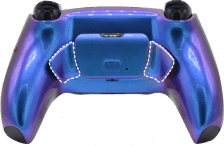
The Mega Modz Advanced Back Buttons for the PS5 and DualSense Edge controllers can be tailored to any play style. They add versatility and performance while maintaining the comfort and feel of the PS5 and DualSense Edge wireless controllers at the same time.
Key Features
Available Advanced Button Settings
There are 3 settings/sub-modes:
*NOTE: The user can configure the Turbo Mod timing sequences.
The times that the stock buttons are pressed and released are programmable in steps of seconds, hundreds of milliseconds, and tens of milliseconds.
Available Controller Configurations
Differ in the advanced level of the Back Buttons selected:
Option 1---Two Rear Buttons with Standard Remap only. Gives an edge in Online Gaming. ALLOWED IN ESPORTS & TOURNAMENTS (PS5 DualSense Controller).
Option 2---Two Advanced Rear Buttons with Standard Remap and Turbo Function for Online/Offline Gaming. Not allowed in tournaments (PS5 DualSense Controller).
Option 3---Two Rear Buttons with Standard Remap + MODS. A modded controller that is complemented with remappable buttons for Online/Offline gaming. Not allowed in tournaments (PS5 DualSense Controller).
Option 4---Advanced Rear Buttons with Standard Remap and Turbo Function + ON/OFF Switch for Mods + MODS. Online/Offline Gaming. Not allowed in tournaments (PS5 DualSense & DualSense Edge Controller).
Each Controller Setup can be configured in the PS5 Controller Creator or DualSense Edge Controller Creator.
In-Depth
NOTE: If your controller Back Buttons configuration is Macro Remap, then, click here to get to the correct instructions
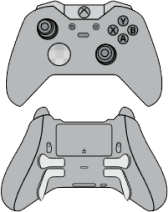
There are 3 main components besides the stock controller buttons involved in the process of configuring rear buttons.
It is a built-in LED board with advanced LEDs. It looks like a square consisting of 4 LEDs located next to each other. All four LEDs are mounted directly into the controller shell. If you’re holding the controller shoulder buttons up then, Slot 1 - upper left; Slot 2 - upper right; Slot 3 - bottom left; Slot 4 - bottom right.


The LED Indicator lets the user interact with the modchip and be aware of what functions are active at any time. It also helps to scroll between sub-modes (If available), set up custom values (timing) for Turbo Mod, and get notifications about active configurations in real time. Each stock button is color-coded when it gets assigned to the back buttons. At any given moment the user is able to detect which button is assigned, and what configuration and setup it represents.
It is an additional built-in button located at the bottom center of the attachment. The main and only purpose of it is to simplify the configuration process. There is no need to press it for any other purposes during the gameplay.


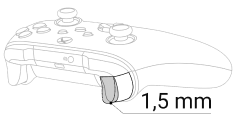
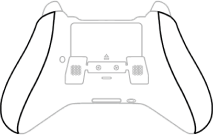
These two large ergonomic buttons are located on the back of the controller in the area of middle finger placement. The location of these buttons is very convenient because the user does not have to reach for them. To avoid any accidental clicks, the middle fingers can be moved up toward the center.


The Advanced Buttons are the main tool in the game. Once set up, they will perform a sequence of programmed instructions.
Color-coded LED lights help the user to better understand what’s going on with the modchip and rear buttons. For instance, when a stock button gets assigned to a back button, the LED indicator will represent a button in the color according to the table below:
| Stock Button | Color | |
|---|---|---|
| R1 | Yellow |
|
| R2 | Red |
|
| L1 | Purple |
|
| L2 | Blue |
|
| Left Stick | Green |
|
| Right Stick | Pink |
|
| Triangle | White |
|
| Square | Light Blue |
|
| X | Cyan |
|
| Circle | Orange |
|
| D-Pad Up | ||
| D-Pad Down | ||
| D-Pad Right | ||
| D-Pad Left |


In order to assign controller buttons to the back paddles please follow the following steps:
Table showing sub-modes and their respective functions
| Sub-Mode | Function | Notes | Adjustable Values |
|---|---|---|---|
| 1 | Simple Remap | Press the Macro Button and the modchip will mimic the stock button | No Adjustable Values |
| 2 | Turbo Function | Press and hold the Macro Button and the modchip will press and release the assigned stock button | The time between button presses and the time the button is pressed can be adjusted. |
NOTE: The second sub-mode (Turbo function) is not available if only Straight Remap was selected in your Back Buttons configuration build. Not applicable to DualSense Edge Controller.
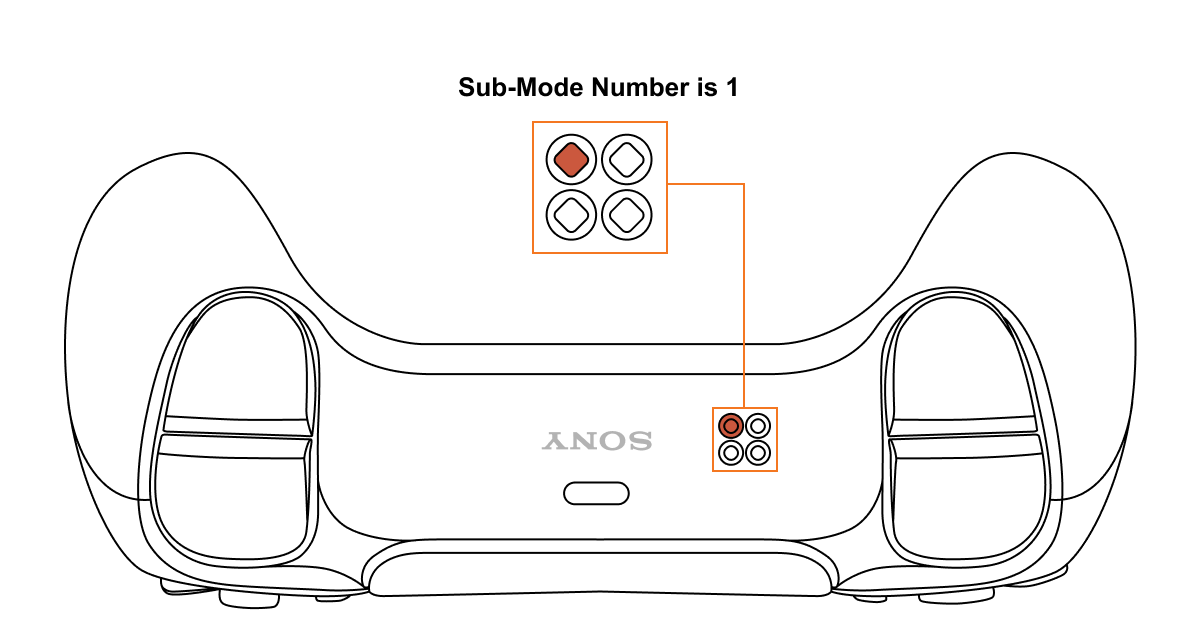
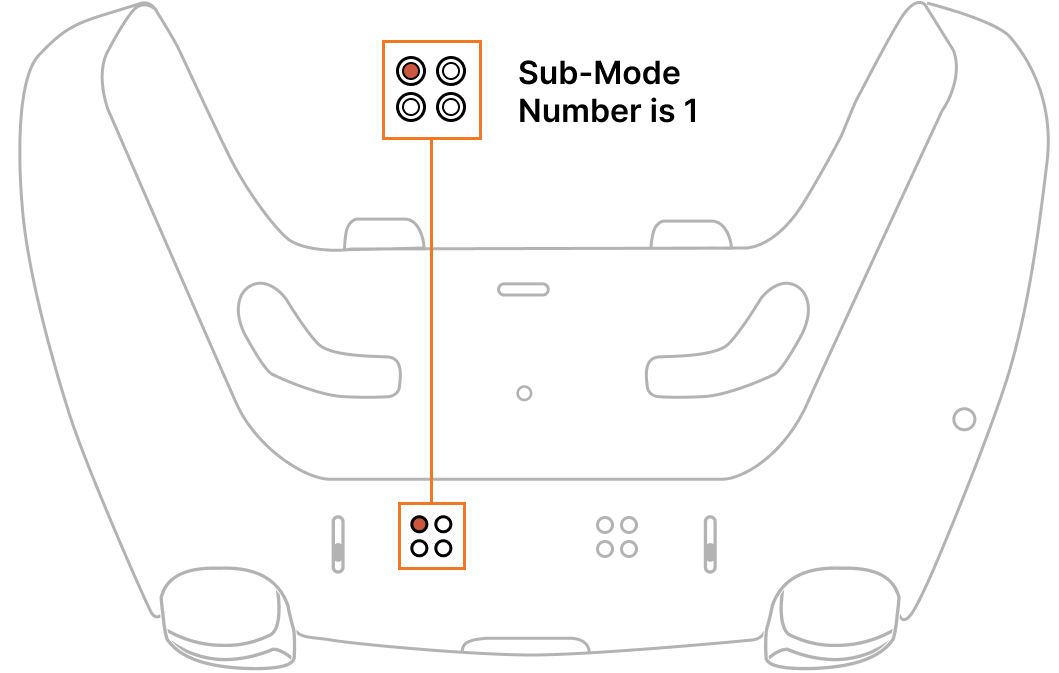
Changing Advanced Button sub-modes:


The LED indicator will flash all 4 slots in GREEN showing that the modchip entered the sub-mode menu. It will then show the sub-mode that is active currently.

NOTE 1: Sub-modes function is not available if only Straight Remap was selected in your Back Buttons configuration build.
NOTE 2: Keep in mind, there is a "3-second rule" that applies every time you change sub-modes. If you've been inactive for more than 3 seconds, the modchip will exit the sub-mode menu without saving the settings.
Once a Back Button gets paired with a stock button, it automatically becomes active (See "Pairing Stock Buttons" section).
However, there is an option to turn a Back Button OFF.


The Slot 1 or Slot 2 LED corresponding to the left or right back button will change its position to Slot 3 or Slot 4 respectively, indicating that the feature has been disabled.


You can enable the Back Button again by repeating the same steps as turning it OFF. (Hold Mod Button and Tap the Back Button)
NOTE: The controller always remembers the last Back Button setup before disabling it. Activating or pairing a Back Button with the same stock controller button will always return to the saved configuration the user has used previously (unless the reset to factory defaults was performed).
If your controller configuration has MODS (Rapid Fire, Drop Shot, etc) and you have selected Advanced Back Buttons functionality in your configuration build, then, you can also configure Back Buttons as ON/OFF switches to disable/enable mods on the fly.
Shooting Mods (Slot 1 LED) and Special Mods (Slots 2-4 LED) gets disabled/enabled separately. In many game instances disabling MODS could be greatly beneficial. The function adds a whole new level of flexibility.
In order to configure the Quick ON/OFF switch for Shooting Mods follow these steps below:


In order to configure the Quick ON/OFF switch for Special Mods follow these steps below:


In case, you have configured both back buttons as ON/OFF switches for either Shotting or Special Mods solely, then, the Left Paddle is always OFF function and the Right paddle is always ON function.


The DualSense Edge allows creating custom profiles to customize the controller’s button assignments including the Back Buttons through the controller user interface. This default feature operates independently of the Mega Modz Advanced Back Button Inputs. If you want to learn more about creating Custom Profiles in the PlayStation App, please visit this page.
It is recommended that the controller back buttons in the Customization App be unassigned before configuring the Advanced Back Button Inputs on your Mega Modz Edge Controller.
Since the Custom Profiles in the App and the Advanced Button Inputs are two separate controller functions, it is possible to assign 2 controller stock buttons to one paddle:
Quick Example:
Mechanics:
Any time the user presses the Left Paddle, a character jumps and shoots simultaneously (Jump Shot). If the gun you are using is semi-automatic, you can further customize the functionality. By scrolling to the second sub-mode (Turbo Function), pressing the Left Paddle on the controller will now perform Jump Shot & Rapid Fire at the same time.
NOTE: Avoid binding 2 contradiction buttons/inputs to one paddle as it will confuse the controller and the gameplay may become unpredictable. A quick example of 2 contradicting buttons are the Jump and the Crouch/Going Prone buttons as these two actions cannot be performed simultaneously in a game or real world.
TIP: Use the quick Advanced Input ON/OFF function to your advantage whenever you have 2 buttons bound to one paddle (see the section above).
In the example above, if you disable the Fire Button (configured through the modchip interface), you’ll be left with only the Jump function (configured through the controller interface). Utilizing this technique will add flexibility to your gameplay as you can go back and forth to the different input configuration sequences on the fly.
IMPORTANT: This section provides advanced settings and requires a full understanding of all the operations described above before proceeding.
The Turbo function (2ND Sub-mode) comes pre-configured with factory settings by default. However, since every game is different, the user is able to program the timing a button is being pressed (ON button timing) and the time between button presses (OFF button timing) via a programming mode.
Button timing is programmed by individually setting up seconds then hundreds of milliseconds, then tens of milliseconds. The minimum unit of time that can be changed is 50 ms. The software won’t allow the user to go above and below the pre-programmed limits.
| Sub-Mode | Min/Max ON Button Timing | Min/Max OFF Button Timing |
|---|---|---|
| 1 | N/A | N/A |
| 2 | 50 ms - 3 sec (default 100 ms) | 50 ms - 3 sec (default 150 ms) |
When programming mode is entered (Mod Button + PS Home Button), the timing may be adjusted in the following order: seconds, then hundreds of ms, then tens of ms.
Programming Mode:
All four LEDs will light up in WHITE to let you know that it’s waiting for further input.
The modchip displays the "seconds" digit first.
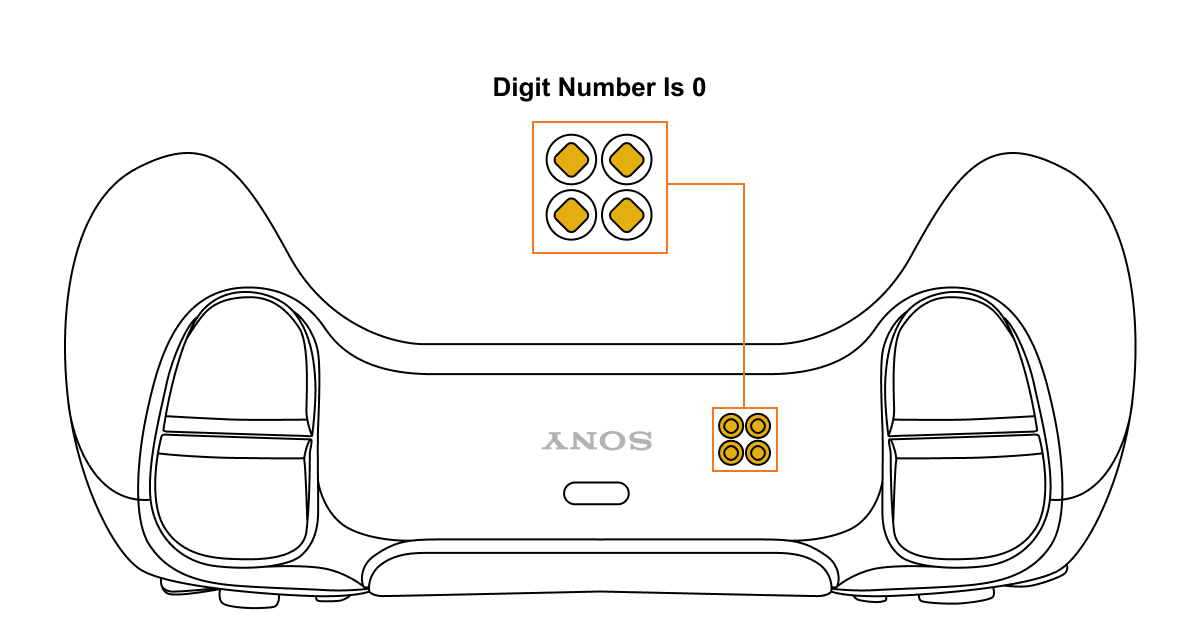
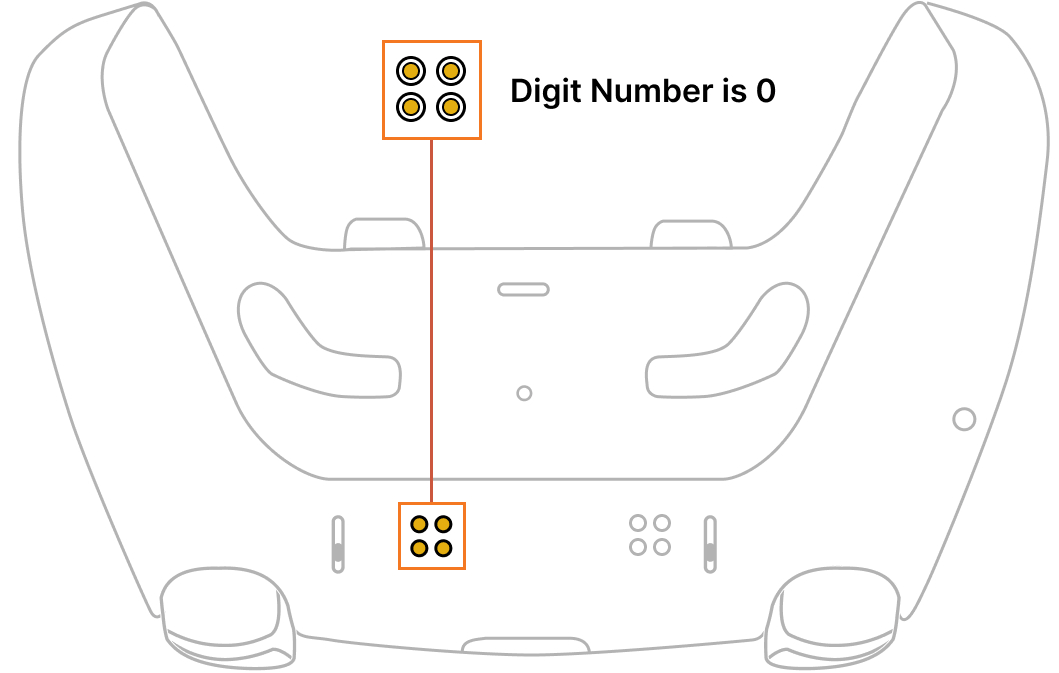
The modchip displays the "hundreds of milliseconds" digit.
The modchip displays the "tens of milliseconds" digit.
EXAMPLE: The button timing you need to configure is 2.340 seconds.
Seconds: 2 seconds (digit 2 on the LED Indicator)
Hundreds of milliseconds: 300 milliseconds (digit 3 on the LED Indicator)
Tens of milliseconds: 40 milliseconds (digit 4 on the LED Indicator)
2.340 seconds = 2 sec+300 ms+40 ms
NOTE 1: The controller always remembers the last custom timing configured.
NOTE 2: There is an "8-second rule" that applies to "Programming Mode". If there is inactivity for more than 8 seconds, the modchip will exit the programming menu automatically.
TIP: There is a "Quick Speed Scroll" option available on every Mega Modz Controller allowing the user to get to the desired value quickly and avoid waiting for the modchip to go through the sequence of digits.
Quickly tapping the R2 button will increase the value by the number of times the R2 button was tapped, getting the user to the desired value quickly.
Quickly tapping the L2 button will decrease the value by the number of times the L2 button was tapped, getting the user to the desired value quickly.
EXAMPLE: Value 1 is showing. Tapping the R2 button 2 times quickly increases the value to 3. Tapping on the R2 button 5 times quickly increases the value to 6.
The modchip allows the user to reset all configurations (sub-modes and timing) to the factory default settings and clear the Back Button Inputs.
Here are the steps:
PS5 DualSense Controller:
All four LEDs will glow WHITE indicating the mod is now awaiting further input.
NOTE: If you entered “Programming Mode” accidentally or changed your mind on the way, you’ll have to wait 8 seconds for the modchip to exit “Programming Mode” automatically. There is no other way to exit the Programming Mode.
PS5 DualSense Edge Controller:
All four LEDs will glow WHITE indicating the mod is now awaiting further input.
NOTE: If you entered “Programming Mode” accidentally or changed your mind on the way, you’ll have to wait 8 seconds for the modchip to exit “Programming Mode” automatically. There is no other way to exit the Programming Mode.
Having issues operating your Mega Modz Controller? Visit our Community Forums for troubleshooting.
Already have an account?